K6 is both an HTTP load and functional test tool, written in Go and using the goja embedded JavaScript interpreter for test scripting purposes
1-Install k6
You can install k6 in two ways:
- Via npm (requires Node.js installed first): npm install -g k6
- Download from GitHub: k6 Releases
👉After installation, verify with: k6 version
2-First Test
- Make sure your API is running.
- Create a JavaScript file (e.g., k6test.js) with the following content
- Run it from the terminal in current directory of your js file : k6 run k6test.js
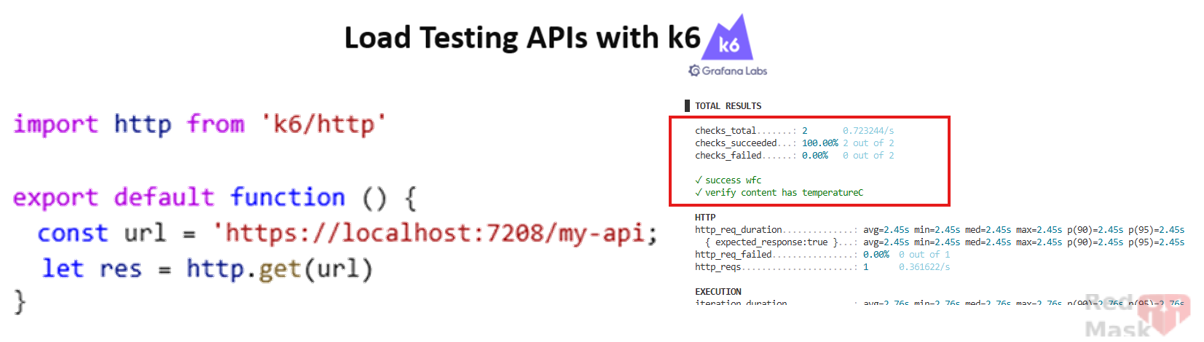
import http from 'k6/http'

export default function () {
    const url = 'https://localhost:7208/wfc';
  let res = http.get(url)
}
3-Understanding Metrics
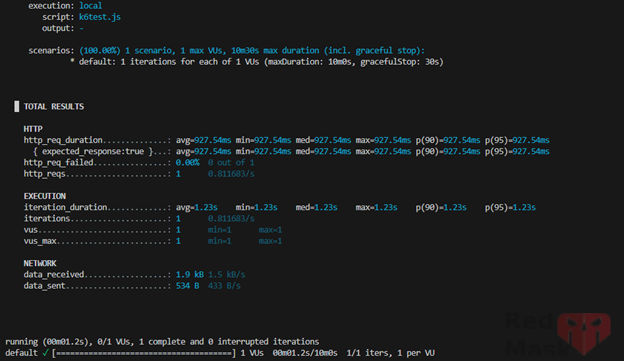
👉 (I ran the file with the command k6 run k6test.js --summary-mode full so that the output list is complete)
As you can see, the output is presented in 3 groups HTTP, EXECUTION and NETWORK, each of which contains values, which we will explain here.
HTTP
- http_req_blocked – Time spent blocked (waiting for a free TCP connection).
- http_req_connecting – Time spent establishing TCP connection.
- http_req_duration – Total request duration (latency).
- http_req_failed – Number of failed requests.
- http_req_receiving – Time to receive response data.
- http_req_sending – Time to send request.
- http_req_tls_handshaking – Time for TLS handshake.
- http_req_waiting – Time waiting for server response (TTFB).
- http_reqs – Total number of requests.
EXECUTION
- iteration_duration – Duration of one test iteration.
- iterations – Total iterations executed.
- vus – Number of active Virtual Users.
- vus_max – Maximum allowed VUs.
NETWORK
- data_received – Bytes received.
- data_sent – Bytes sent.
4-k6 Test File Conventions
In this file, you determine the conditions, rules, and how to run and test the API, as well as analyze the output.
The execution of js files is important, and there are a number of conventions that must be followed.
import http from 'k6/http'

export const options = {
    //This object, as its name suggests, is used to override settings By default, k6 uses    certain default settings.
  //We will talk a lot about this object
  // 👉 is optional
};

export default function () {
 //The test body is written here
 //The most important part of this file, which is also mandatory, is this one}

export function handleSummary(data) {
 // The output format is decided here
 // 👉 is Optional
}
5-Using check
If you want to perform a check on each output of an API call and make sure that the conditions that are important to you are present in all outputs, you can tell the check function to do this and it will do it and show you the result.
import http from 'k6/http'
import { check, sleep } from 'k6'

export default function () {
    const url = 'https://localhost:7208/wfc';
  let res = http.get(url)

  check(res,{
    'success wfc': (r) => r.status === 200,
    'verify content has temperatureC': (r) => r.body.includes('temperatureC'),
   })
}
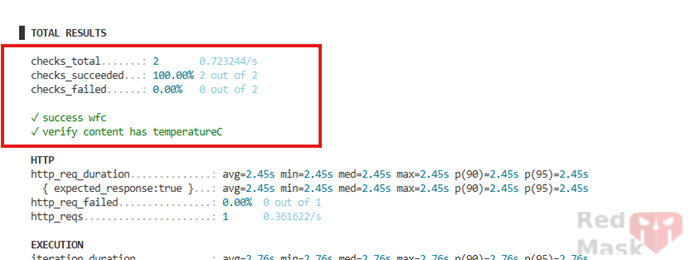
As you can see, the part inside the red box was added to the output. Here I told the system to do 2 checks for me. One is to check that all outputs are 200 responses. Second, all outputs (which are json) must contain the word 'temperatureC'.
6-The sleep function
takes an input of seconds and pauses between API calls for the same amount of time.
       ........
     check(res,{
    'success wfc': (r) => r.status === 200,
    'verify content has temperatureC': (r) => r.body.includes('temperatureC'),
   })

  sleep(0.3)  //suspend VU execution for 300ms
}
7-Using handleSummary
You can customize output reporting:
export function handleSummary(data) {

  const med_latency = data.metrics.iteration_duration.values.med;
  const latency_message = `The median latency was ${med_latency}\n`;

  return {
    stdout: '==>'+latency_message,
    'summary.json': JSON.stringify(data), //the default data object
  };
}
As you can see, the function has an input called data, which is basically the same information as the output (picture 1).
In the function above, I told k6 to generate two outputs.
How?
Because I am returning an object with 2 properties. One is called stdout and the second is 'summary.json'
Stdout is a keyword that we use to set the output of cmd and we can't change it. In the line stdout: '==>'+latency_message, basically I changed the output that I had in the cmd environment and said instead of displaying all those values, only display latency_message. How did this happen because of stdout. I changed cmd with this output
Every property except the keyword above means that I want to save the output in the format that I want in a file with the same name (property name). Here the output is saved in a file called summary.json in the current location of my js file.
👉You can give it any name with any suffix or even no suffix.
8-The options Object
By default, k6 runs 1 iteration with 1 virtual user (VU).
Now with the following change, I told k6 to make requests with 10 users simultaneously for 20 seconds or 400 times.
👉Between 20 seconds or 400 requests, whichever comes first, the test will stop
👉The number of requests (iterations) is divided by the number of users (vus). (That is, each user will make 40 requests)
method 1 – Fixed Users and Duration
export const options = {
  vus: 10,
  duration:'20s',
  iterations: 400,
}
After the test finishes, the console output will look similar to this
|
running (24.0s), 00/10 VUs, 77 complete and 0 interrupted iterations default ✗ [======>-------------------------------] 10 VUs 24.0s/20s 077/400 shared iters |
method 2 – Ramping Users (stages)
export const options = {
  //executor:'ramping-vus' , scenario:'default' , source:'stacktrace' //<==default scenario
  stages: [
    { duration: '4s', target: 100 },
    { duration: '3s', target: 500 },
  ],
};
With these settings, I told k6 to first Ramp up to 100 users(start from 0 increase to 100) over 4s, then to 500 users over 3s.
👉The executor property plays an important role in this case, which we will talk about later. Just know that we have such a property with the default value 'ramping-vus'. Other valid values for this part are shared-iterations , per-vu-iterations , constant-VUs , ramping-vus , constant-arrival-rate , ramping-arrival-rate
👉When you use stages, you can no longer use the previous settings and they are practically meaningless
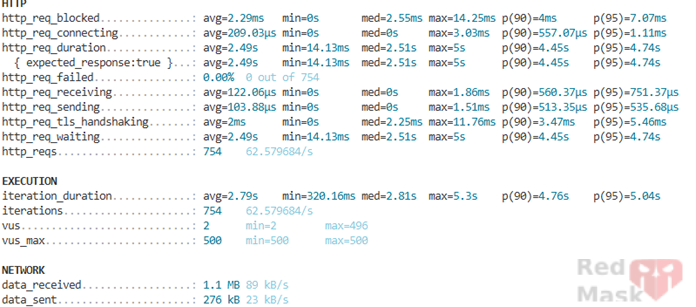
At the end of the execution, you will see something like this
|
running (12.3s), 000/500 VUs, 747 complete and 0 interrupted iterations default ✓ [======================================] 000/500 VUs 7s |
Another important property of this object is thresholds, which can be used with both of the above settings.
export const options = {
  ....
  thresholds: {
    http_req_failed: ['rate<0.01'], // http errors should be less than 1%
    http_req_duration: ['p(99)<10000','p(95)<20000'], // 99% of requests should be below 1s
    iteration_duration:['med<2200']
  },
};
This is where we set conditions for the k6 output and say that we expect the output to meet the above conditions and if it doesn't, show us in the UI exactly which one is being violated. As you can see, thresholds is an object whose properties have the same names as the k6 output data (see the image below) and the condition values are a list of conditions on the output properties of each part.
By running the file with the above configuration, the output will look like this:
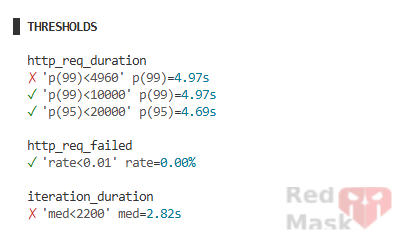
These reports (photo above) are the same conditions that you had set for execution and tell you whether the expectations you had from the API are now happening in practice or not.
9-Executors
This table shows how changing the executor affects execution and testing (if you use the stages settings, the number in the table below refers to the target property value).
|
Executor |
Description |
|
shared-iterations |
Iterations are shared across all VUs. |
|
per-vu-iterations |
Each VU runs a fixed number of iterations. |
|
constant-VUs |
Fixed number of users sending requests. |
|
ramping-vus (default) |
Gradually ramps users based on stages. |
|
constant-arrival-rate |
Constant request rate throughout test. |
|
ramping-arrival-rate |
Request rate ramps up or down. |
👉 For simulating real-world traffic, constant-arrival-rate and ramping-arrival-rate are often best.
When to use what:
in summary, k6 allows developers to simulate realistic traffic, validate API responses, and enforce performance goals. Start simple, then gradually add thresholds, executors, and scenarios as your testing needs grow
- Use thresholds → to enforce performance SLAs.
- Use ramping-arrival-rate → to simulate real-world traffic spikes.
- Use multiple scenarios → to test different API endpoints simultaneously.
10-Scenarios
All the settings we have done so far were actually changing a scenario called the default scenario. But k6 has the ability to define multiple scenarios and when you run the file, it runs all the scenarios and displays the report for each separately. For this, there is a property called scenarios inside the options object, which is itself an object. But you determine the name of the properties, which can be the name of the same scenario. Take a look at the following example:
export const options = {
    scenarios: {
        my_test_1: {
             // name of the executor to use
            executor: 'ramping-arrival-rate',

                 // common scenario configuration
                 startTime: '10s',
                 gracefulStop: '5s',
                env: { EXAMPLEVAR: 'testing' },
                 tags: { example_tag: 'testing' },


           // executor-specific configuration
                 vus: 10,
                 iterations: 200,
                    maxDuration: '10s',
                          maxVUs: 50,
            stages: [
                {duration: '30s', target: 50},
                {duration: '1m30s', target: 100},
                {duration: '30s', target: 0},
            ],
        },
    },
};
In the code above, I defined a scenario called my_test_1. The stages and executor properties are the same as what we have discussed so far, so let's move on to the new ones.